It now seems as if it has been years since we began the wait for an Apple TV 3 jailbreak! The truth is, I have grown tired of the wait and decided to look into what I could do with my existing Apple TV 1 & Apple TV 2. What I found was an tool known as OpenELEC 2.0! OpenELEC is one of the projects that aims to give users the ability to install XBMC as a standalone operating system for a wide variety of devices. What OpenELEC has done is build a stable version of XBMC using Linux and then create an installable package, integrated with a host of drivers, for a growing number of machines, including: old & new laptops, old & new desktop computers, raspberry pi boxes, and, yes, even your old Apple TV 1! Sadly, due to the software/hardware, the Apple TV 2 is not supported.
OpenELEC is not, necessarily, new to the Apple TV scene. What is new is that they have recently released OpenELEC 2.0, a stable version of their software based on XBMC Eden. This gives the Apple TV a strong and stable, standalone, XBMC experience. With it being an Eden build, it even offers your little silver box AirPlay! The team has added a few functionality increases to XBMC and even has a custom group of add ons and services that are made available to OpenELEC users only. These tools alone, make this a project worth looking at! If you are interested, you can find more specific information for this project at openelec.tv. To save you the visit, here are some of the key points made by their team:
What is OpenELEC?
Open Embedded Linux Entertainment Center, or OpenELEC for short, is a small Linux distribution built from scratch as a platform to turn your computer into a complete XBMC media center. OpenELEC is designed to make your system boot as fast as possible and the install is so easy that anyone can turn a blank PC into a media machine in less than 15 minutes.
Key Features:
- It’s completely free
- Full install only 80-125MB
- Minimal hardware requirements
- Trivial install onto HDD, SSD, Compact Flash, SD card, pen drive etc
- Optimized builds for Atom, ION, Intel, Fusion etc
- Simple configuration via XBMC
- Plug and Play external storage
- File sharing out of the box
Required?
- Mac, or Linux, computer
- USB Stick,with at least 1 Gig of memory (to be on the safe side)
- Apple TV 1
- Remote Control
- 10-20 minutes
STEP 1:
Connect the USB key to your machine, then open your Terminal app (For Mac it is located in /Applications/Utilities) and cut/paste the following commands to download the AppleTV SwissArmyKnife USB creator script for Mac OS X:
- curl -O https://chewitt.openelec.tv/atv_swissarmyknife_osx.sh
- chmod +x atv_swissarmyknife_osx.sh
- sudo ./atv_swissarmyknife_osx.sh
STEP 2:
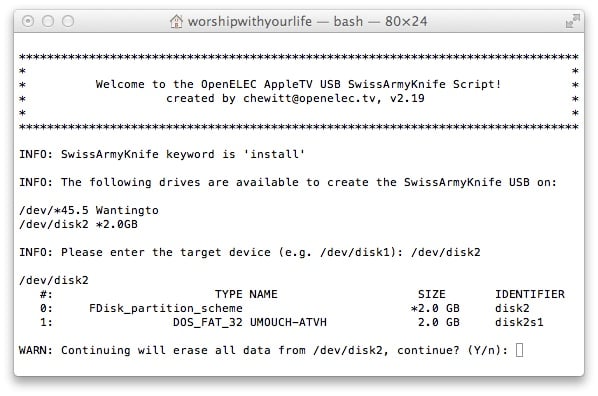
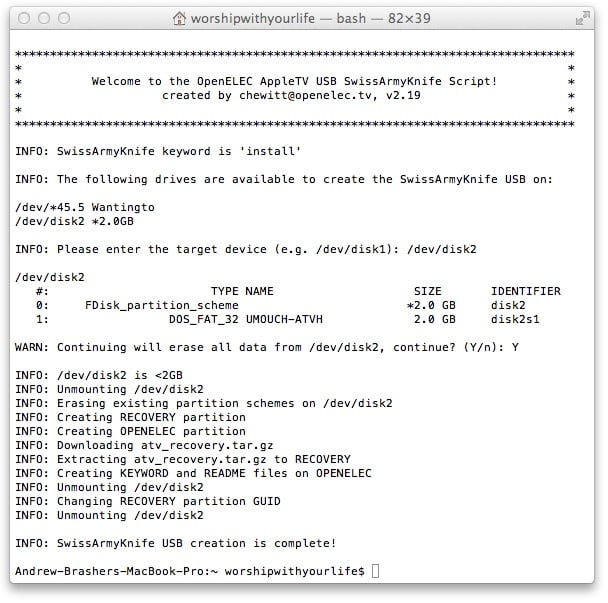
 The script will ask you confirm the /dev/disk# for the USB Drive. It runs with root privileges so please be careful with your selection! You will see a list of all current drives available on your machine… so simply look for the name and size of your thumb drive. Once the target device has been confirmed the script will repartition the USB Stick, download files needed to boot the AppleTV (11MB) and then install them to the thumb drive. It should take no more than a couple of minutes to complete, at best.
PLEASE NOTE: If you choose the wrong drive, you could accidentally delete important content. Make sure you read the list of available devices carefully. Mine, for example was a 2 GIG drive that I named UMOUCH-ATVH. Once I knew the drive, I entered “/dev/disk2” and hit Enter. You are then prompted to confirm the election… type in “Y” for yes. When complete, your output will match the image below:. STEP 3:
Power the AppleTV OFF and then connect the USB Stick to the single USB port, between the Ethernet port and the Power Cable on the back of your device.
STEP 4:
Power the AppleTV ON (Plug it in). After 10-15 seconds you should see the Grey/Blue OpenELEC logo on the screen, then the “SwissArmyKnife script” will start and confirm the current keyword function. The default keyword is “install”. This is where the device will download the OpenELEC software from the OpenELEC website.
STEP 5:
Before anything destructive is done, the installer will pause for roughly 30 seconds, and display a warning message; this ensures you enough time for you to power the AppleTV off (remove the power cable) before anything is changed. After the 30 second wait the installer continues.
What is Happening (advanced):
Once it completes, a message will be displayed telling you it is safe to remove the USB key and reboot.
That’s It! If you followed the steps correctly, you should have XBMC running as your standalone operating system! If you had any troubles with the process, openELEC has a great source for troubleshooting any, and all, issues: Troubleshooting USB Key Creation & Opperating System!


Comments
Be The First to Comment