
Do you have more than one Apple TV in your house? Are you the techy in your community, forced to install and set up XBMC on Apple TVs for all those people you know and love? What if there were an easy way to simply clone the XBMC installation from one device to multiple others? Well, you can. This process can be used for a variety of reasons, but the most popular would absolutely be:
- Backing-up your current XBMC set up (allowing you to restore to it at any time)
- Building an XBMC template (if you will) to help setting up other Apple TV’s quicker & easier
- Creating a standard of XBMC, including add-ons, for installing on your other iDevices (iPad, iPhone, etc.)
Whatever your reasons, this is a worthwhile skill to have. For the sake of clarity, for those of you who do not know, the Apple TV 1 and the Apple TV 2 differ from each other in that they bother run on different operating systems. The Apple TV 1 was originally build on the OSX platform, same as the older MACs. The Apple TV 2 on the other hand is built on the iOS platform. Same as the iPad, iPhone, & iPods. These differences will cause the process of cloning your Apples to vary dependent on which devices you own. That said, grab your ATV, your computer and let’s go:
Requirements
If you are using a Windows Machine
If you are using a MAC machine
- CyberDuck – File Manager
- Terminal App (preinstalled)
[Extract The Items Needed For Cloning]
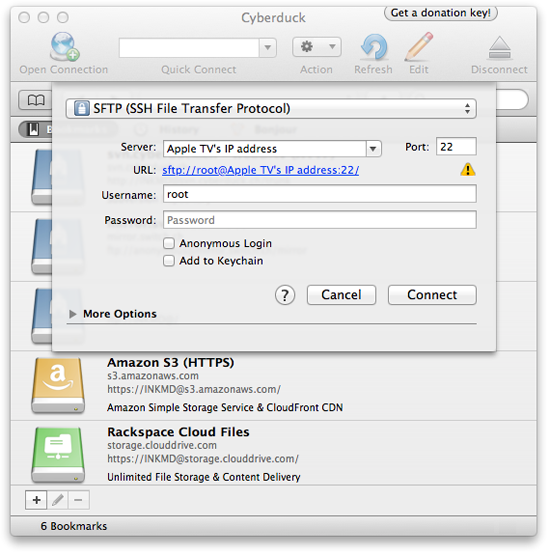
Step 1: We first need to open your File Manager. You will be met with either an option to open a Connection, if so select this option, or a group of boxes requiring input. Fill out the boxes using following sample. Note yours may look different but the information will be the same.
- At the top you will likely see a drop down menu that says “File Transfer Protocol.” Here you will need to select the option that says “SFTP” or “SSH”
- Server: Here you need to enter the IP address of your Apple TV
- Apple TV 1 (SILVER BOX) = Username: frontrow & Password: frontrow
- Apple TV 2 (BLACK PUCK) = Username: root & Password: alpine
Step 2: Now we will need to navigate to the following file location, and save a copy of the folder titled “XBMC” to your desktop, or any other location that you will remember. This will take some time as this file contains EVERYTHING pertaining to your XBMC installation:
- Apple TV 1 (SILVER BOX) = /Applications/XBMC.app/Contents/Resources/XBMC/
- Apple TV 2 (or any iDevice) = /private/var/mobile/Library/Preferences/XBMC/
[REMEMBER] this is your CLONED XBMC folder. It is important that you take good care of this item as this is what we will use on the next machine… or your current machine should you simply be making a backup. Once this is done, all following steps will take place on the device you want to install the CLONED FOLDER on.
Installing The CLONED XBMC Folder
Step 1: Start with a blank canvas:
- Factory restore your target device (making sure you don’t upgrade to an un-jailbroken firmware)
- Jailbreak the Apple TV again
- Do a fresh Install of XBMC on the device.
Step 2: Launch XBMC… THEN EXIT XBMC… on the same device.
Step 3: Connect to your to the Apple TV using the File Manager as we did in beginning of this guide.
Step 4: Navigate to the following file location:
- Apple TV 1 (SILVER BOX) = /Applications/XBMC.app/Contents/Resources/XBMC/
- Apple TV 2 (or any iDevice) = /private/var/mobile/Library/Preferences/XBMC/
Step 5: Once you can see the XBMC folder on your current machine we need to do two things:
- Rename the XBMC folder, on the Apple TV, to “OLDXBMC”
- Upload the CLONED XBMC FOLDER, from your desktop, that we saved on your computer earlier in this guide. This may take some time to upload as this file contains EVERYTHING pertaining to your XBMC installation. So give it time
Step 6: Now we will need to connect to our device via the Terminal App, via SSH, using the following commands.
- ssh root@[Your Apple TV’s I.P. Address]
- Example: ssh root@192.168.2.18
- This can be found under General/Network on your ATV’s main menu
- Note:Should you receive an “Authentication Error,” copy and paste the following command into the Terminal window and press Enter, then continue.
- rm ~/.ssh/known_hosts
Step 7: Once connected we will input one command.
- chown -R mobile:mobile /private/var/mobile/Library/Preferences/XBMC/
Step 8: Reboot and Enjoy
Congratulations! Not only do you have a safe backup of your XBMC installation, but you can now set up twice as many devices in a quarter of the time.
Read also: Top 10 best XBMC addons for Apple TV 1 and Apple TV 2.


Comments
Be The First to Comment